Rejuvenate and Restore: Fence Cleaning Near Me for Pristine Surfaces
Rejuvenate and Restore: Fence Cleaning Near Me for Pristine Surfaces
Blog Article
Deck Discoloration 101: How to Change Your Exterior Room
Welcome to "Deck Discoloration 101: How to Transform Your Outside Space", where we will certainly guide you via the detailed procedure of staining your deck to boost its elegance and safeguard it from the elements. A well-stained deck not only adds worth to your residential or commercial property however also develops a warm and inviting environment for outside gatherings and leisure. In this comprehensive overview, we will cover crucial subjects such as selecting the appropriate discolor, preparing your deck for discoloration, using the stain correctly, and maintaining your tarnished deck for long-lasting outcomes. With our expert pointers and practical guidance, you'll be outfitted with the knowledge and self-confidence to successfully complete your deck discoloration task and transform your outdoor area right into a stunning oasis. So allow's start!
Picking the Right Spot
When choosing the appropriate stain for your deck, take into consideration the type of timber and preferred finish. Softwoods like pine and cedar are extra permeable and have a tendency to absorb tarnish more conveniently, while woods like oak and mahogany need a stain with greater pigment concentration to accomplish a desired color. Inevitably, choosing the ideal tarnish entails finding a balance between showcasing the wood's all-natural high qualities and achieving the desired level of protection and aesthetics for your deck.
Preparing Your Deck for Discoloration
To guarantee optimal outcomes when tarnishing your deck, appropriate prep work is important. Prior to beginning the discoloration procedure, it is crucial to extensively tidy and inspect your deck.
To test if the deck is completely dry, sprinkle a couple of drops of water on the surface area. If the water beads up, the deck is not prepared for discoloration.
Next, check the deck for any kind of damaged or rotten boards. Change any type of boards that remain in inadequate condition to guarantee a smooth and even surface for staining. In addition, check for any type of loosened nails or screws and tighten or change them as required.
Lastly, sand the deck surface area to get rid of any type of rough places or splinters. This will not just boost the look of your deck but likewise guarantee an extra even application of the discolor. Utilize a medium-grit sandpaper or a sanding machine to attain the wanted outcome.
Applying the Stain
To achieve a professional and long-lasting finish, the following step in deck staining is to wage the application of the discolor. Before beginning, it is very important to select the right devices for the task. A sprayer, brush, or roller can be used, depending upon individual choice and the dimension of the deck. Regardless of the device selected, it is important to use the tarnish uniformly and continually to ensure a consistent look.
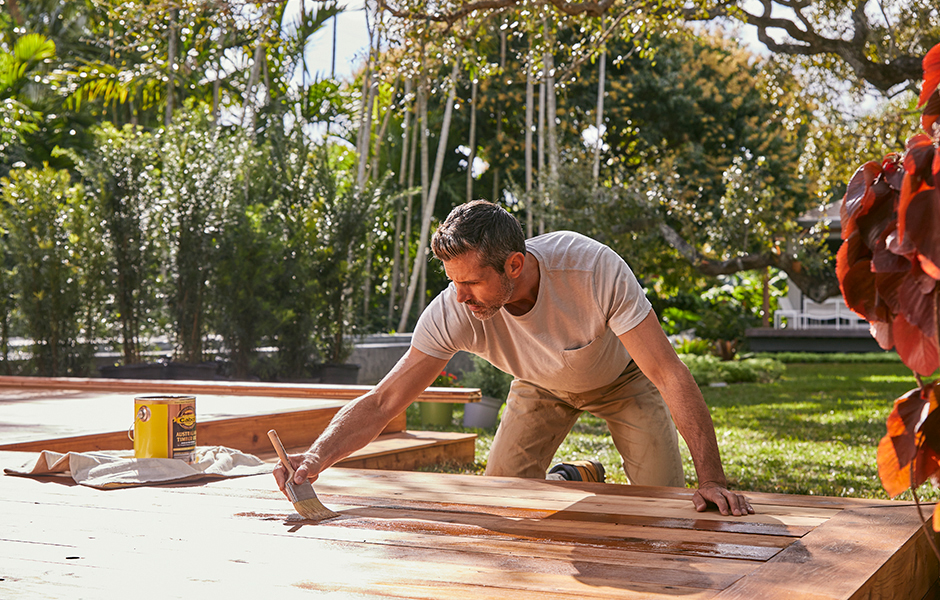
Prior to applying the tarnish, it is suggested to do a test patch on a small, low-profile area of the deck. This permits any type of changes or modifications to be made before waging the entire deck surface. It is additionally crucial to follow the maker's directions concerning the application process, including the recommended number of coats click and drying out times.
When using the tarnish, it is best to work in sections, beginning with one end of the find out this here deck and relocating towards the other. This makes sure that no locations are missed out on or overlapped, causing an also and smooth coating. It is also essential to keep a wet edge while functioning, to protect against any type of noticeable lines or touches.
After the discolor has actually been used, it is very important to permit sufficient drying time before strolling on the deck or placing any furniture or items on it. This makes certain that the tarnish effectively follows the timber and gives a long lasting surface that will certainly stand up to the components.
Keeping Your Tainted Deck
Proper upkeep of your tarnished deck guarantees its durability and visual appeal. fence staining near me. After investing effort and time into tarnishing your deck, it is essential to comply with a normal upkeep regimen to maintain it looking its ideal for years ahead
Among the very first steps in keeping your stained deck is to frequently cleanse it. Utilize a mop or fallen leave blower to get rid of particles such as fallen leaves, dust, and sticks. To eliminate dirt and gunk, make use of a mild you could try this out detergent and water solution and scrub the surface area with a soft brush. Rinse extensively with tidy water.
Check your deck on a regular basis for any indications of damages, such as loose boards, nails, or splintering. Fix any kind of concerns promptly to prevent additional damages and guarantee the safety and security of those using the deck.
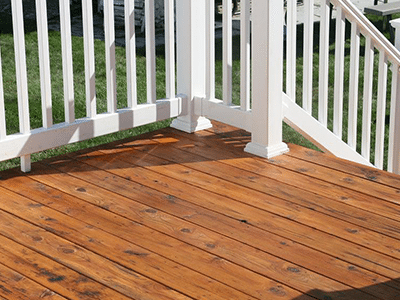
Finally, take into consideration reapplying a fresh layer of tarnish every few years to maintain the shade and vibrancy of your deck. This will certainly also aid to secure the timber from sunlight and water damages.
Tips for an Effective Deck Staining Project
A crucial action for achieving a successful deck staining job is picking the best type and amount of stain. With an overwhelming number of options available, it is vital to comprehend the different types of spots and their suitability for your details deck.
When you have actually selected the stain type, it is very important to calculate the quantity required. Inadequate discolor might result in an uneven finish, while excess stain can result in a sticky, gaudy surface. To determine the amount of tarnish called for, gauge the square video footage of your deck and check the maker's guidelines for insurance coverage rates. It is always suggested to buy slightly a lot more stain than needed to represent touch-ups and future maintenance.
Before starting the staining process, prepare your deck by cleaning it completely. Remove any type of dust, debris, and old tarnish using a deck cleaner or power washer. Permit the deck to dry completely prior to using the tarnish. Finally, comply with the maker's directions for appropriate application methods, including utilizing a sprayer, brush, or roller .
Conclusion
To conclude, deck staining is an important action in changing your exterior space. By selecting the right tarnish, preparing your deck appropriately, applying the discolor successfully, and maintaining it routinely, you can boost the appearance and resilience of your deck. Complying with these tips will make certain an effective deck staining task and permit you to enjoy your outside area to the fullest.
Welcome to "Deck Staining 101: Exactly How to Change Your Outdoor Space", where we will lead you via the step-by-step process of staining your deck to improve its charm and safeguard it from the elements. In this comprehensive guide, we will certainly cover crucial subjects such as choosing the ideal tarnish, preparing your deck for discoloration, applying the stain appropriately, and preserving your discolored deck for lasting results.To achieve a lasting and expert coating, the next action in deck staining is to proceed with the application of the tarnish.A vital action for accomplishing an effective deck discoloration project is picking the appropriate kind and quantity of discolor. By selecting the right tarnish, preparing your deck properly, using the tarnish efficiently, and keeping it routinely, you can boost the appearance and toughness of your deck.
Report this page